Photoshop CS4: Retouching and Smoothing Technique for Faces
 This is a full Photoshop retouching technique that will give your subjects the flawless skin that is so popular in magazines today. It is a quick and easy way to give full retouching to senior portraits which will be sure to increase sales. Try experimenting with the techniques since each photograph is different.
Step one: Open your image in Photoshop and make whatever cropping, density and color adjustments are necessary before beginning the retouching process. Also it is a good idea if the subject has bad acne or scars to use the cloning tool or a soft brush to tone down some of the bumps. When using these tools try setting your opacity to 50 percent and be sure to clone the area that is the closest match in tone to the area you are correcting.
Step two: Create a new layer via copy for your photograph by going to layer, new layer, and new layer via copy. (Control J for pc or Command J for Mac)
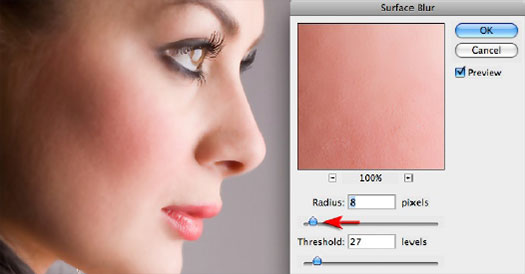
Step three: Create a surface blur by going to filter, blur, surface blur. Each photograph will be different, but a good starting point is to set the radius between 20 and 25 and the threshold in the 10 to 12 area. Again each photograph is different, and facial retouching requires some trial and error.
Step four: Hold down the Alt key and click on the vector mask button at the bottom of the layers palette. This will remove the surface blur, but will allow you to reapply it using a brush in the next step.
Step five: Choose a soft brush by clicking on the brush icon in the tools menu and then using the drop down menu to select the brush. Set the opacity of the brush to around 40%. Again, experimenting with the opacity will only help you perfect the technique of retouching and there is no set in stone answer to how dense you would like to apply the mask.
Step six: Color the face and also the neck of the subject making sure to avoid eyes, lips and teeth. Experiment with the hair using a lower opacity. Each time you go over the same area it will increase the amount of blur applied so be careful of this.
Step seven: Flatten and save your photograph. Remember as you work on any photograph it is always a good idea to save an original copy of your photograph and also it can't hurt to save your photograph in its separate layers as you go along.
Remember over-retouching can have as negative an impact as under-retouching. The object is to give your client that soft perfect skin without destroying the contours of her face.