A Guide to Understanding the Tools of Photoshop CS2
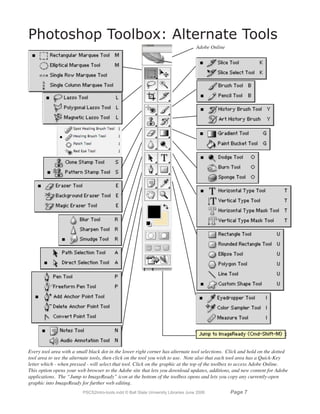
 Have you used Photoshop before and felt overwhelmed by the number of tools at your disposal. Do you know what those tools do? Well, if your unsure I'll try to bring some clarity. I wanted to create a series of tutorials and FAQ's on just getting to understand all the tools of Photoshop and what they do. I'll focus on Adobe Photoshop CS2 for these "How-to's", but you should be aware that most of the same tools are present in previous versions of Photoshop.
This specific post deals with just giving you guys an overview of what's in Photoshop and why. I will go into greater detail of each individual tool in future – special, "How-to's". These "How-to's" will be completely dedicated to one tool each, so you'll understand the tool completely and not be confused by descriptions or info regarding other tools.
THIS IS CONTINUATION OF A PREVIOUS POST THAT GAVE AN OVERVIEW OF TOOLS 1-6. THE PREVIOUS POST IS INTITLED "Guide to Understanding and Using Every Selection Group Tool in Photoshop"
LET'S CONTINUE WHERE WE LEFT OFF
7TH TOOL: SPOT HEALING BRUSH
This one of the coolest and simplest tools you'll use in Photoshop. If you do a lot of scanning this tool will become your new best friend. This is a tool you'll use often. The SPOT HEALING BRUSH does exactly as its name says. Basically this tool is used to get rid of spots, dust, hair, scratches, or any unpleasant artifact without destroying the image in the process. It would be to complicated to explain how its able to remove a spot and knows exactly what to place in there – so just think of it as magic.
8TH TOOL: BRUSH TOOL
This is pretty much your standard brush tool that you'll find in a number of different programs that deal with graphics. This tool allows you to brush color on to something. That's a very plain description, but I think you should get idea.
9TH TOOL: CLONE STAMP TOOL
This is an awesome tool. It's very much like a cousin to the SPOT HEALING BRUSH in that they both are often used to remove spots or dust. The CLONE STAMP TOOL is a little more sophisticated though. This tool allows you to clone a region of an image and then paste that region onto another part of the image; the tool automatically attempts to blend this pasted region to make it look as natural as possible. This is often used in restoration of damaged photographs.
10TH TOOL: HISTORY BRUSH TOOL
The history brush tool is a bit of a weird tool. I haven't used this tool at all in the years I've been playing around with Photoshop. To be honest I'm not completely sure of how to explain what it does. But I'll to explain it this way – it allows you to paint in history states of the image you've been editing. If that makes no since its because to some extent it seems to be an advanced tool. Because it's an advanced tool I'll leave this on alone until a later time.
11TH TOOL: ERASER TOOL
This is another straightforward tool. This is basically a brush you use to erase portions of an image.
12TH TOOL: GRADIENT TOOL
The gradient tool is used to apply a gradual tonal or hue change across an object or image. Basically you can make an image fade from one color to another color. This tool is very simple to use, but it does require some thought to figure out the best way to apply a gradient to an image.
13TH TOOL: BLUR TOOL
This tool does exactly what its name implies – it's a brush that blurs regions of the image. I haven't used this tool very at all. That's not to say that I don't blur parts of the images I work with. In Photoshop there is literally a million ways to do one thing When it comes to selectively blurring an image, there's a more precise way of doing it.
14TH TOOL: BURN TOOL
The BURN TOOL is one photographers will instantly understand. For those you aren't photo people, the burn tool is used to selectively darken parts of an image. I must say I don't often use this tool, as there is a more precise way to selectively darken a part of an image.
We've just gone over tools 7-14 and in the next post I'll finish off the last few. After the next post I will start to focus on each individual tool. Starting with the MARQUEE TOOL. I will go into as much detail as possible reguarding this tool, its uses, its options, and some tips and tricks.