Photoshop Effects: The Fish Eye Lens Effect in 7 Steps
The Fish Eye Lens Effect is normally used to create a funny, wild looking photo. The problem is most people may not be able to afford the lens due to it’s expensiveness. Another problem might be that the lens won’t be compatible with your camera unless it’s an actual expensive Nikon or something like that. But, thanks to Photoshop, a new, inexpensive way to create this wacky, fun effect has been discovered. Follow these steps in order to create this effect.
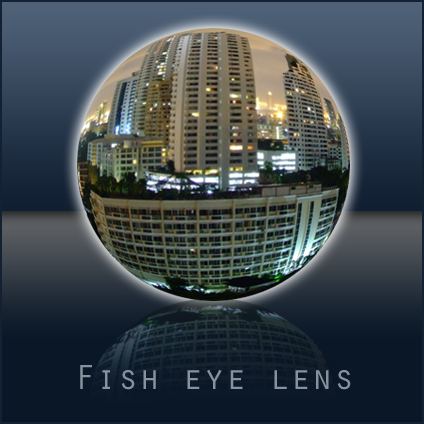
First, start out by looking up a picture on Google to use for your Fish Eye effect. I chose a nice skyline of Frankfurt at night.
Once you’ve decided on which photo to use, open it with Photoshop. IMPORTANT: Remember to double click on the “Background” Layer beforehand in order to make it editable. Otherwise, the steps below won’t work since the Background Layer is not able to be edited.
Step 1: Start by using the Crop Tool (C) and cropping the photo to the point where it has more of a square shape. If your photo is already square-like, this step is not necessary.
Step 2: Next, select the Elliptical Marquee Tool (M). Drag out a fairly large circle in the center of the picture (or wherever you feel is more emphasized in the photo). While creating the selection, remember to hold down the Shift button. This helps you create a perfect circle.
Step 3: After you feel comfortable with your selection hit (Shift+Ctrl(Command)+ I). Or, you could go to (Select>Inverse). After inversing the photo, hit the Delete button. This leaves you with the selection you recently made with the elliptical marquee tool. Hit (Shift +Ctrl[Command] + I) once again. This leaves with only the circular part of the image selected
Step 4: Now, in order to get rid of the large amount of empty space around the image, we need to go to (Image>Crop). This trims the image down so there won’t be a large amount of excess space.
Step 5: This step is probably one of the most important steps because now, we’re going to create the actual Fish Eye effect. We can do this by simply going to (Filter>Distort>Spherize). Leave the amount at 100%, and keep the mode at normal. Hit “OK”. Now, after you’ve “spherized” the image, you have your basic fish eye effect. You can stop here, but these last two steps are ones I like to use to enhance the picture.
Step 6: Before you move on, Deslect the Fish Eye Len (Ctrl[Command] + D). Create a new layer, and drag it below “Layer 0” or the layer where the fish eye effect was created. Select Black as your foreground color, and hit (Alt+Backspace). This fills the background with black. Though this step is not required, it is highly recommended.
Step 7: This last step is something I like to add to the photo to make it seem a little more realistic. Start by selecting the Fish Eye Lens layer once again. Right Click on it and select “Blending Options”. After the Blending Options box pops up, select “Gradient Overlay”. Set the Blend Mode to “Soft Light”. Keep the Opacity at 100%. Keep the default gradient colors (Black and White), but select reverse. Set the style to “Radial”, and the angle at 65 °.
Well, there you have it. Now you’ve got yourself a nice, realistic looking Fish Eye Lens Effect. Once you’ve mastered this technique, you can apply it to almost any photo. I hope this tutorial worked out well for you. Thank You!